Monday, October 29, 2012

 
TURKEY CENTERPIECE
Two sides
 
 
I posted this turkey centerpiece on Paper Craft Planet and a request for directions was made so here they are. 

Turkey Centerpiece
Original artwork by Theresa Krout
I started out with a piece of 12x12 double sided patterned paper that I really liked.  I cut that in half so I could make 2 turkeys.  These instructions will be for one.  Just repeat for the second.
(Optional) Take one of the 12”x6” patterned paper and use a border or edger punch on the entire length of the 12”.  Score to create the folds are directly in the center of each image and evenly spaced. (about every ¼”)
1.   Once you have your 12”x6” patterned paper evenly scored, gather at the bottom and use a strong adhesive between the folds to hold it together.  I used Liquid glass from CTMH to hold mine secure.   Use a clothes pin or other holding device while this dries.

2.   Then I cut the turkey out using the Cricut Cartridge Artiste from Close To My Heart.  If you would like to purchase this cartridge, please visit my website at ctmh.com/theresak.

The turkey is on page 78 of the Artiste handbook.  Use accent 3 and the Thanksgiving icon at 5”.

3.   Cut off the back half of the turkey, up from the back of his legs and keeping the highest point of his back.  Sponge, decorate or do whatever you would like to your turkey head and body.  I used google eyes and sponged edges.

4.   Line up the feet at the bottom and the top of the back into the center fold and use a strong glue to secure.

5.   Next you need to make a pop up card base.  Please email me if you would like to know how to do this.  theresa125@centurytel.net.  I do not have tools to make this so I made it on my own.  If you have a sizzix with the pop up base, you can use that

6.   Once you have your pop up base, you need to line the back with base to cover the square hole created by the pop up.  This should be ½” larger round each side of the pop up base- or larger if you would like.

7.   Decorate your pop up area.   I used the patterned paper from CTMH paper pack- STELLA to decorate the pop up base and for matting behind my Happy Thanksgiving.  The stamp set I used was A LITTLE EVERYTHING, from CTMH -item # D1408.  If you are not able to order this older item, please contact me and I will see if I can locate one for sale.  I LOVE this handy set and use it often.  Contact me for more information.

8.   Now attach the turkey to the back side of your pop up base.  I was able to use just a few glue dots to hold it secure. 

9.    Add a few decorative items to each side of your turkey to add interest to the back of the pop up base so it does not look so plain.  I added pumpkins using the set Autumn’s Gifts, also an older set from CTMH.  Item # D1172.  Then I used glitter to add interest to the pumpkins.

Thank you for visiting my blog and if you have any questions, please feel free to contact me at theresa125@centurytel.net. 
Since this project is pretty complex, if you would like to order a complete project set for $10.00, please email me to place your order.  Shipping is included within the US.  You will need adhesives, glue dots and scissors to assemble your project.  Some papers or colors may vary depending on availability.


Halloween Cards
I made these delightful trick or treat cards just for fun. 

Clearly the Best: The Stamp Behind The Mask (S01E08)


Wednesday, October 24, 2012

Trick or Treat!

We never get any trick or treaters at our house because we are 7 miles from town.  So I decided to make my own!  Then the creativity came storming in and I did a whole window full of the Halloween theme.  Here is the window from outside.
 Each of the treaters or 11 1/2" tall.  I have one more thing to add- fall leaves.  That is why I left room on the right and under the treaters.  I have a bag full of fall leaves, but cant find them.  Will repost one I find them. 
I really am please with how they turned out.  Let me know what you think.  Thanks for stopping.

Tuesday, October 23, 2012

Easy paper projects

Deck the Halls.. and your tree with these simple yet elegant Holiday Ornaments.  The first two are shapes cut with the Cricut Art Philosphy cartridge and stamped using CTMH stamps.  I used two different kinds of techniques and different embellishments. 
 
These are cut using the Cricut Artiste cartridge and no stamping.  The large one is cut at 3" for the white and 2" with the outdoor denim.  Then I alternated the color and sizes down to the smallest.  If you need more details, please contact me.  Thanks for visiting.  Theresa


Love Your Layout: October 2012


Monday, October 22, 2012

Halloween items for sale Set 1 &2

Halloween Decorations for Sale $1.50
Includes 3 cards and 4 focal point monsters
Yes they have real google eyes!
 
 
Halloween Decorations for Sale $2.00
Spider and web (6.5" x 7.5")
Lamp post 6.5" x 3.25")
Round 6x6 Witch card

Halloween Card Set for sale

7 piece cards set for sale
Enjoy the cute card holder and 6 cards, just in time to give away for Halloween.
This set includes envelopes and the cards you see here.  $10.00
Contact me today!
 
Theresa Krout
715-924-2722
Shop on-line at:  ctmh.com/theresak
 

Pumpkin Candy Basket

This was very easy to make.  I just cut strips of orange cardstock.  Used one for the top ring and the rest I attached on the inside and folded around to the opposite side.  Then I added a handle and filled with candy.  What a sweet treat.  Let me know what you think. 

Fall Centerpiece

This is a Fall Centerpiece using vellum and a battery operated candle.       
Above is the centerpiece without candle turned on.
Below is the candle on without room lights.

Here it is with room lights on.

I think it is adorable!  What do you think?  Let me know.  Thanks for visiting. 

Ink It Up!


Tuesday, August 28, 2012

Studio J®: Step-by-Step Basics

SCRAPBOOKING online- NO PRODUCTS, NO SUPPLIES, NO TOOLS OR EVEN TAPE!!  JUST YOUR COMPUTER, INTERNET AND YOUR PICTURES!!  I have ordered them and you would think they were traditional 3-D layouts!
Every layout is custom printed using the highest quality photo processing paper and technology. Your layouts will last a lifetime! Choose from dozens of themed kits to suit any event or occasion.

You’ve taken the photos—now keep the memories. In five easy steps, create beautiful 12" × 12" two-page layouts showcasing your stories. When the custom prints arrive at your door, slip them into your cherished albums. No one will guess it only took a few minutes to design them!

Competed layout (2- 12"x12" pages)  $6.95 
Theresa Krout
(715) 924-2722


Friday, July 27, 2012

Read, comment and win A FREE HOW TO BOOK

Read what is new with CTMH and at the bottom of this blog you will see how to enter my drawing for a FREE Make It From Your Heart instructional book. Some restrictions apply.

NEW AUTUMN/WINTER IDEA BOOK IS LIVE!
You can view the NEW IDEA BOOK on my website for FREE.  Each page will inspire you to new creative heights. 

8 WOTG- We have 8 Workshops On The Go that have all the materials included to complete 4 page layouts (12"x12").  Starting on page 21.


Bonus Projects- Each WOTG will have materials left over after completing the layouts.  Add a few other items and you will be able to complete the bonus projects as well.  Pick one or the other or do both, its your choice.

LOVE TO MAKE CARDS??  Well we now have 2 cardmaking kits- complete with everything you need to make 15 beautiful cards!  Avonlea will help you create everyday themed cards and Pear and Partridge will help you complete your Christmas cards in a snap.


Wait there is more!!!!

NEW! CRICUT CARTRIDGE! A MUST HAVE! 

Creativity over the top!!  Our new Artiste Collection Cricut Cartridge will help you be on the cutting edge of creativity with 700 images: themed projects, cards, font, shapes and 3-D items.
The collection comes complete with:
The Artiste cartridge
3- My Acrylix D size Stampsets
3- 12"x 9" Dimentional Elements in coordinating shapes          all for only $99.00
                                                                                                                                 (retail value of nearly $125)
Or purchase the Art Philosophy Collection for $99.00 (see page 15 for details)

Purchase either CTMH Cricut Cartridge and I will give you  -How To Use My Cricut- lessons for FREE!


Wait!!! THATS NOT ALL!


ENTER TO WIN!!!
  1. Add a comment about what you love most about the new Idea Book and I will enter your name in my drawing for a FREE Make It From Your Heart how to book. 
  2. Must comment before September 1st, 2012 to qualify. 
  3. Winner of drawing must not be a current CTMH consultant. 
  4. No purchase necessary. 
  5. Bonus ways to enter: each $25.00 purchase qualifies for one additional entry in drawing.
  6. Each new MEMBER of my blog will qualify for one entry (after July 27th, 2012)    
  7. Host a gathering or book party in Aug and receive 2 additional entries.
Drawing for winner will be August 31, 2012 and announced here on my blog.                     

New 2012 Fall/Winter Idea Book is here!!

Click here to view New Idea Book!

Friday, May 25, 2012

That is what friends are for (LOL)

I made these cards and sold them to the first person who saw them!  What a true friend!  I tried to concentrate a little on cards for men.  I even stamped a matching image on the envelopes.  I will make more of these because everyone seemed to love them.  Simple and quick and very well liked!  Just have to finish the order for 5 more cards plus a few graduation ones for myself and then I will get to making these soon.  LMK if you would like anything similar to these for the MAN in your life!


Monday, May 14, 2012

Another New Baby!
Amber and Ryan (Ron's oldest) had Brair Rae Paulson at 8:59 yesterday (May 13th- Mother's day)  She was 8#1oz and 20" long.  Welcome Brair!  To see more about this wonderful blessing.... visit backhomeinchetek.blogspot.com

Saturday, May 12, 2012

Great for her BIRTHDAY or MOTHER'S DAY

 Express your love and appreciation for all she does!
 

I was thinking of mothers this morning. Rons, mine and myself and
became inspired to create one of these.
It is in an 8”x 10” frame and I am now taking orders. Each one will
be unique and if you would like to include a personal message or your name
it would replace the flower on the bottom.
I hope to make several of these and I will post each as they are created.
Contact me if you would like to place an order for one. 
Only $10.00 without frame $15.00 with frame
This one is for Rons mom- Anita. She is a wonderful lady who has truly lived
up to this sentiment!

Wednesday, May 9, 2012

This card is much prettier in person.  You almost can see the glitter around the edge of the green.  This card will go to Anita, my mother in law who is very sweet and loving.  HAPPY MOTHERS DAY!

This card also has glitter.  This card does not have a "home" designated but I am sure it will serve a purpose sooner or later.  They were just so much fun to make.
Here is another Mothers day card.  It is so simple to just change the sentiment in the center and you have another wonderful card idea.

Here is my last card.  I made this one for my mom.  The card looks much better in person.
If you are interested in the directions on how to make this card, please leave a comment and I would be glad to send it to you.  Hope you enjoyed visiting INKYFINGERS1!  Have a super Mother's Day and weekend.

Monday, April 30, 2012

A coworker and her husband are moving away and so I decided to create some "We've Moved" cards for them.  I took a picture of them and thought I LOST them but here they are.
Isnt he just so cute!!!! 
Here is a close up...
I really enjoyed making these cards and was inspired to do the other project that I had in mind for my friends.

This is an "easy trifold card" that opens up.  I made all of it from scratch, one of a kind design!  So it took about 7 hours to create.  I brought it to the party as a center piece for a table.
This is the inside of the card.


Inside I made sure I included the puppy from the "We've Moved" cards.

Close up of the images inside the card.  Some were done odn the cricut but the lamp and chair were done using stampsets and hand cutting.  It was a lot of fun to make this house card.
This is a close-up of the window.  It has real curtains, a flower box and shutters that are 3-D.  Most of the paper items for the window were cut using Cricut Art Philosphy cartridge and then I added sparkles to the center of the flowers.  If you look close you can see the flowers even have tiny leaves.

Monica and Jeff, I hope you enjoy having this center piece card as much as I enjoyed making it.
Monica, you have a very sweet and gentle spirit and I will miss you.  We did not work together much but when we did, you always made me feel respected, appreciated and our converstations were always encouraging.  Thank you for being the wonderful person you are and please keep in touch.  Theresa and Ron 


Thursday, April 26, 2012

Some special cards I made to give to some special friends.  You can see it but the leaves are all embossed.  IF YOU GET ONE OF THESE CARDS, post here to let us all know how you liked it.


UPDATE:  Card with seeds. 


4-20-12

Latest picture of sprouts.
Thanks again Victoria, Chris and Renee


CHECK OUT MY SCRAP ROOM!!!


Shelves up above to store items like stampsets, Cricut Cartridges and in the baskets are punches, chalk and items used occasionally.
CHECK OUT MY SCRAP ROOM!!!


Shelves up above to store items like Cricut Cartridges and in the baskets are punches, chalk and items used occasionally. 


Metal shelves- cheap and easy to customize to fit your needs.  These shelves are below my printer.  Great for storing books, folders and other "office" supplies.


Book shelf is great for organizing this and that.  To the left is where I store all my tax information and paperwork.  To the right is a file cabinet that I use for both business, craft and personal paperwork used most often.


To the left you can see one of those over the door organizers.  I have my ribbon, accessories and wood stampsets stored on these shelves.  To the right I use the pegboard to store items on hooks.  Peg board is a cheap and easy way to get things organized!


This is around the corner and the other side of the peg board.  If you can see it while you are scrapping, you will most likely use it so store so you can SEE what you have.


This is an older desk that I put to use.  Above are boxes with my cards.  Ones I have made and special ones that I have received, all homemade.  I try to display most of the cards I have received, but I have too many!  I use this desk for my radio and full albums. 


Here is another one of those metal shelves.  Storage and display.


Shelves, storage units (from walmart).... make it all possible.


Crates, baskets, boxes.... all cheap and easy to find.  The red and tan pok-a-dot baskets were $1.00 each!!! 


Storage of my ink was one of the most important tasks that I had when I first started scrapbooking.  I tried a few other things but this is what works best for me.  I sort the ink by color families, most often used are toward the top of each pile.  It is really a great way to keep them at my fingertips!
Ink... close at hand.... gives you inkyfingers!!! 


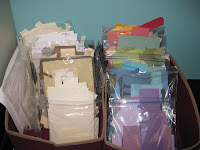
I store small scraps of cardstock in quart size bags and sort by color family.  Quick and easy way to use up them scraps!


Close up of my cardstock system.


I store and sort all my Reflections paper packs in alphabetical order and in one large crate.  The yellow stickers show the first letter of the name of the paper pack.  Each bag has all the whole and scraps left over from the paper pack.  I take out whole sheets of cardstock and add to my supply (above picture) to use on any project.


Most of my projects I make an instruction sheet for furture use.  Each project has a folder and I keep them all in a crate.


I keep bigger pieces of cardstock that wont fit in the quart size bags, in 12x12 bags, by color family, in a crate divided into sections.  Love the cardstock storage system that I have!


Last view of my craft room.  Tables can be pulled out for additional crafters.
Anyone want to craft?  Contact me to set a paper date!  Thanks for visiting.  Theresa