Monday, April 30, 2012

A coworker and her husband are moving away and so I decided to create some "We've Moved" cards for them.  I took a picture of them and thought I LOST them but here they are.
Isnt he just so cute!!!! 
Here is a close up...
I really enjoyed making these cards and was inspired to do the other project that I had in mind for my friends.

This is an "easy trifold card" that opens up.  I made all of it from scratch, one of a kind design!  So it took about 7 hours to create.  I brought it to the party as a center piece for a table.
This is the inside of the card.


Inside I made sure I included the puppy from the "We've Moved" cards.

Close up of the images inside the card.  Some were done odn the cricut but the lamp and chair were done using stampsets and hand cutting.  It was a lot of fun to make this house card.
This is a close-up of the window.  It has real curtains, a flower box and shutters that are 3-D.  Most of the paper items for the window were cut using Cricut Art Philosphy cartridge and then I added sparkles to the center of the flowers.  If you look close you can see the flowers even have tiny leaves.

Monica and Jeff, I hope you enjoy having this center piece card as much as I enjoyed making it.
Monica, you have a very sweet and gentle spirit and I will miss you.  We did not work together much but when we did, you always made me feel respected, appreciated and our converstations were always encouraging.  Thank you for being the wonderful person you are and please keep in touch.  Theresa and Ron 


Thursday, April 26, 2012

Some special cards I made to give to some special friends.  You can see it but the leaves are all embossed.  IF YOU GET ONE OF THESE CARDS, post here to let us all know how you liked it.


UPDATE:  Card with seeds. 


4-20-12

Latest picture of sprouts.
Thanks again Victoria, Chris and Renee


CHECK OUT MY SCRAP ROOM!!!


Shelves up above to store items like stampsets, Cricut Cartridges and in the baskets are punches, chalk and items used occasionally.
CHECK OUT MY SCRAP ROOM!!!


Shelves up above to store items like Cricut Cartridges and in the baskets are punches, chalk and items used occasionally. 


Metal shelves- cheap and easy to customize to fit your needs.  These shelves are below my printer.  Great for storing books, folders and other "office" supplies.


Book shelf is great for organizing this and that.  To the left is where I store all my tax information and paperwork.  To the right is a file cabinet that I use for both business, craft and personal paperwork used most often.


To the left you can see one of those over the door organizers.  I have my ribbon, accessories and wood stampsets stored on these shelves.  To the right I use the pegboard to store items on hooks.  Peg board is a cheap and easy way to get things organized!


This is around the corner and the other side of the peg board.  If you can see it while you are scrapping, you will most likely use it so store so you can SEE what you have.


This is an older desk that I put to use.  Above are boxes with my cards.  Ones I have made and special ones that I have received, all homemade.  I try to display most of the cards I have received, but I have too many!  I use this desk for my radio and full albums. 


Here is another one of those metal shelves.  Storage and display.


Shelves, storage units (from walmart).... make it all possible.


Crates, baskets, boxes.... all cheap and easy to find.  The red and tan pok-a-dot baskets were $1.00 each!!! 


Storage of my ink was one of the most important tasks that I had when I first started scrapbooking.  I tried a few other things but this is what works best for me.  I sort the ink by color families, most often used are toward the top of each pile.  It is really a great way to keep them at my fingertips!
Ink... close at hand.... gives you inkyfingers!!! 


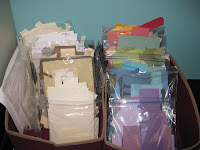
I store small scraps of cardstock in quart size bags and sort by color family.  Quick and easy way to use up them scraps!


Close up of my cardstock system.


I store and sort all my Reflections paper packs in alphabetical order and in one large crate.  The yellow stickers show the first letter of the name of the paper pack.  Each bag has all the whole and scraps left over from the paper pack.  I take out whole sheets of cardstock and add to my supply (above picture) to use on any project.


Most of my projects I make an instruction sheet for furture use.  Each project has a folder and I keep them all in a crate.


I keep bigger pieces of cardstock that wont fit in the quart size bags, in 12x12 bags, by color family, in a crate divided into sections.  Love the cardstock storage system that I have!


Last view of my craft room.  Tables can be pulled out for additional crafters.
Anyone want to craft?  Contact me to set a paper date!  Thanks for visiting.  Theresa


Friday, April 20, 2012

I made 8 of these cards to give to a friend as a gift.  They are moving and they can
use them to send their new address to friends.  I had a great time making these cards! 

Close up of the adorable sentiment on front.  Contact me if you would like to order these cards for yourself.  $2.00 each and can say anything, hello, thinking of you, happy birthday... Whatever I have that will fit in the thought box.
WHAT A BEAUTIFUL CARD!
And it had a secret inside!
I received this card from some very special friends at work.  They heard that I was cutting back hours and would not be able to see me at work much so they sent me with
a WE WILL MISS YOU gift and this wonderful card.
The paper is handmade with seeds inside!  The bumps you see on the outside of the card
are actual seeds that will blossom into beautiful flowers.  So...
So I removed the insert card which left the handmade paper with seeds.
I then carefully cut the card and planted the pieces in a pot, watered and set in the sun ON 4-9-2012.

THIS IS A PICTURE OF THE TINY FLOWERS STARTING TO SPROUT!
What a wonderful and special gift!  Thank you to my dear friends!
TINY SPROUTS AS OF 4-20-12 (11 days)